8 X 10 inch freehand sketch in pencil
This is the sketch I showed you last week. I want to do a larger 11 X 14 painting. When I go to Portrait and Figure Studio, I just jump in with paint, adjusting as I go. This time I decided I wanted to make a study of the subtleties of of the shadows, particularly on the face. Knowing more about these shadows will be helpful when I do a freehand painting of another face.
I have a lot of choices when I consider enlarging. I can enlarge the sketch to 11 X14 by simply drawing it larger.
Or I can enlarge the photo to 11 X 14 and trace outlines of the larger photo. My scanner has a 8.5 by 14 inch bed so using the scanner would require some manuveuring. It is possible to make a 11 X 14 scanned photo in two sections.
But sometimes a scanner is not available. A person can always draw a grid on either the photo or the drawing as they are now and use the grid as a basis for enlarging. This is a traditional method of enlarging.
.

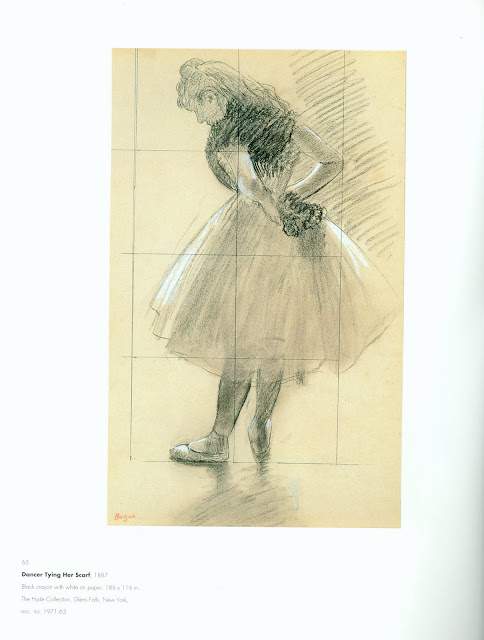
Here is an example from Edgar Degas. In this case, the drawing is about 18.5 X 11.5 inches. By drawing a grid with the same number of squares (but larger ones) on his final canvas, he could enlarge the drawing, keeping the proportions the same. This is something anyone can do by measuring carefully with a ruler.
I decided to use a transparent grid because I wanted to keep the photo as it was. I made the grid by using heavy clear acrylic which Walmart sells by the yard and a Sharpie Brand pen and a ruler. It is important to measure carefully. If the squares are not perfect, any enlargement you make using the grid will not be perfect. The squares on this grid are 1.25 inches on each side.
I elected to draw the enlargement on tracing paper because I can see a premade grid laid under it. The final enlargement on the tracing paper will not have distracting grid lines on it. This grid has 1.5 inch squares. Notice that I numbered the squares along the edge of the photo and the edge of the tracing paper. That helps me find the square I want to draw in. I don't always number the squares but it can be helpful.
I usually start in the center when I am enlarging a face. If I were enlarging a Still Life photo or a landscape photo I might start elsewhere. The starting point doesn't matter. What is important is that the correct shapes are drawn into each square.
I have drawn some of the shadows, leaving them unshaded but and have shaded others. This is because I am looking for information, not drawing something that will stand alone as a piece of art. I will be working on this drawing for several more hours. Below are enlargements of specific sections of the drawing as it now stands.
I haven't put much shading or shapes of shadows on the bottom lip, but I have looked at the photo carefully and will look at it again as I paint. The slanted area between the bottom lip and jut of the chin has not been shaded either. I noted with shading that the "color" of the shadow on the clothing varies from the shirt to the jacket. There will also be a variance between the skin of the neck and the red shirt.
In this section of the ear, hair , and jaw line, I have started putting in some of the major shapes.
The wreath is simply an outline at this point. Just as in other drawings, I find it helps to start with the general shapes and refine them gradually.
I am always pleased to hear your comments. If you have a question, I will try to answer it in a future blog. If you have trouble leaving a question or comment, click on "About leaving a comment", the first Label to the right of this screen.
I hope you find lots of reasons to smile today.
I am always pleased to hear your comments. If you have a question, I will try to answer it in a future blog. If you have trouble leaving a question or comment, click on "About leaving a comment", the first Label to the right of this screen.
I hope you find lots of reasons to smile today.


No comments:
Post a Comment